Modbus RTU and ASCII over a Serial Port
Modbus Connect 0.8.9 talks Modbus RTU and Modbus ASCII to devices on a local serial port, next to Modbus TCP. This post covers the settings, the unit-ID scan, the demo ports and the limits.
What it does
Connect the RS-485 or RS-232 line to the computer, usually through a USB-to-serial adapter, and add the device as RTU or ASCII. From there a serial device works like a TCP one: sessions, charts, data logging, register writes, the Communication Log and workspaces. Serial support arrived in 0.8.2 and runs on Windows, macOS and Linux.
- RTU sends binary frames with a CRC-16. ASCII sends the same request as hex text that starts with
:and ends with an LRC. - Function codes 01, 02, 03, 04, 05, 06, 15 and 16: read coils, discrete inputs, holding and input registers; write single and multiple coils and registers.
- Several unit IDs can share one port. The port is opened once, and their requests take turns, each after 3.5 character times of silence on the line (fixed at 1.75 ms above 19200 baud). A reply from a unit ID other than the one asked is rejected.
Add a serial device
1. Pick RTU or ASCII
The switch at the top of Add Device offers TCP (Ethernet), RTU (Serial · binary) and ASCII (Serial · text).
2. Choose the port
Port lists the serial ports the operating system reports, with the USB adapter's product or manufacturer name where it has one. If you plugged the adapter in after opening the dialog, click the refresh button beside the list (Rescan ports).
3. Match the line settings
- Baud rate: 1200, 2400, 4800, 9600, 19200, 38400, 57600 or 115200.
- Device ID: the unit ID, 1 to 247.
- Line settings, folded into a summary such as
Line settings · 8E1 · 1000 ms: Parity (Even, Odd, None), Data bits (8 or 7), Stop bits (1 or 2) and Timeout (ms), 100 to 10000.
The defaults are 19200 baud, 8E1 and 1000 ms, for ASCII as well as RTU. If your ASCII device uses 7 data bits, change Data bits. The app does not detect any of these settings.
4. Add it
Enter an optional Device Name and click Add. The device list shows the device by port and settings, for example COM3 · RTU 19200 8E1.
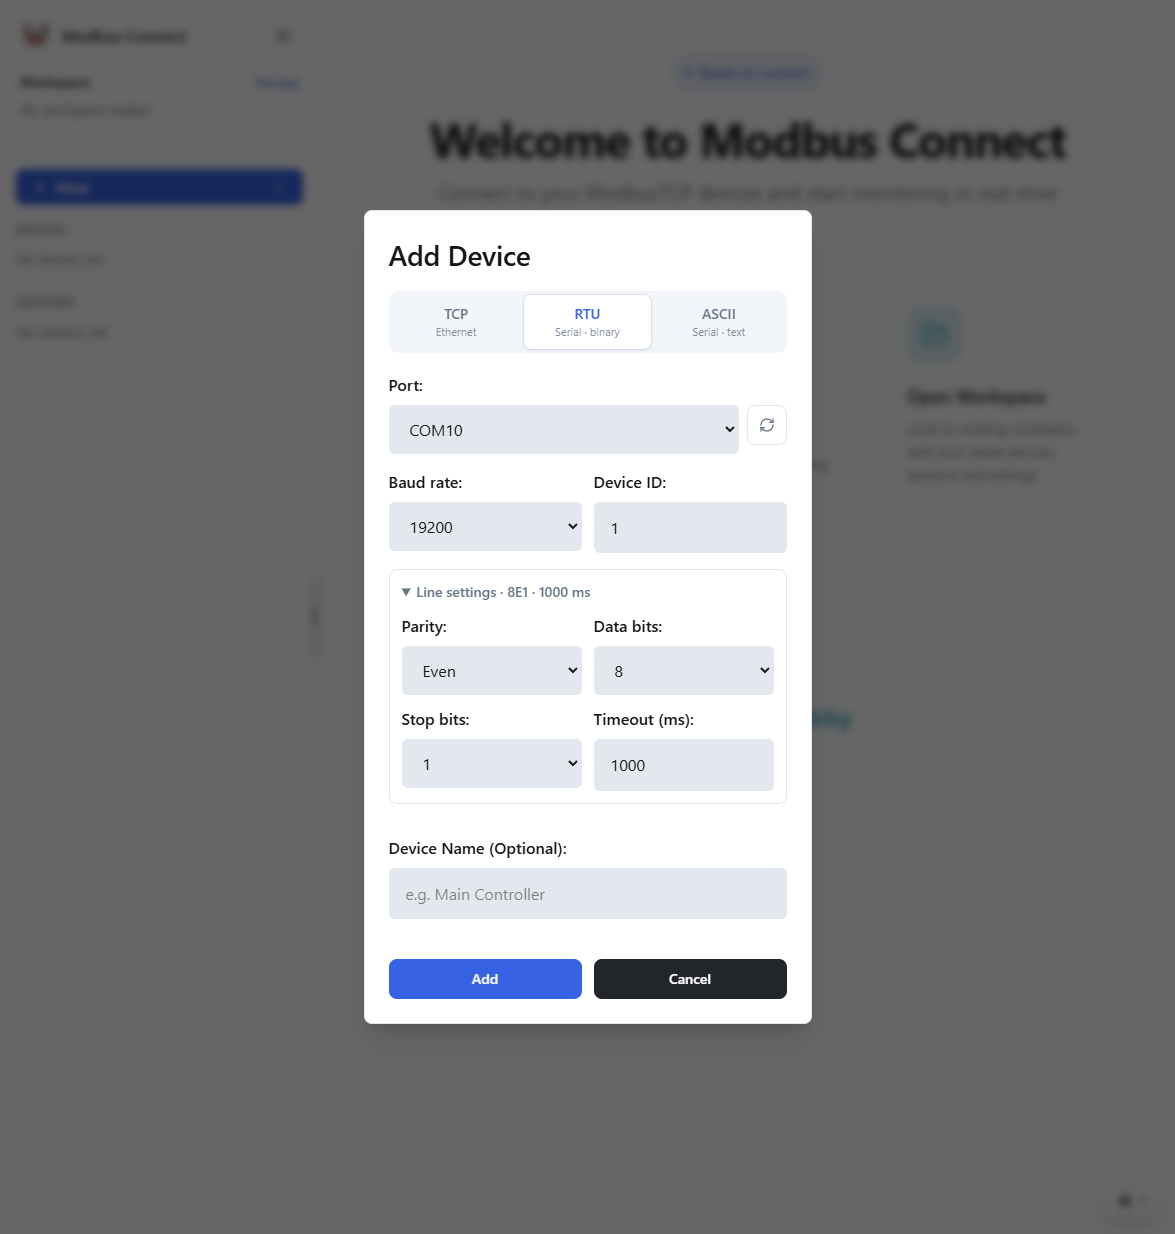
Add Device with RTU selected and the default line settings.
Scan a port for unit IDs
The Device Scanner has the same switch. With RTU or ASCII selected, pick the port and line settings, set Start ID and End ID (1 to 247) and click Start Scan. Each unit ID in the range is polled in turn, and every one that answers is listed with an Add Device button.
The scan uses the line settings you entered: at the wrong baud rate or parity, nothing answers. IP Range scanning and the ping latency indicator are TCP only and are hidden for serial.
Try it without hardware
Turn on Settings → Workspace & startup → Demo mode. The Port list then starts with two simulated ports, DEMO-RTU and DEMO-ASCII. Each carries three units: 1 is an energy meter, 2 a drive and 3 an oven controller. You can add them, read and write registers, scan the unit IDs and watch the frames in the Communication Log, with no adapter attached.
When a device does not answer
Open the session's Communication Log. For a serial device it shows the frames as they go over the line: RTU as hex bytes including the CRC, ASCII as the : text including the LRC. A failed exchange shows an [Error] entry, such as CRC check failed, LRC check failed or no reply from the device after the timeout.
Windows: only one program can have a COM port open. If another one holds it, the app reports Could not open COM3 with an access-denied error. Close the other program and connect again.
Linux: opening a port needs membership of the dialout group (uucp on Arch). Without it, the app says so and gives the command: sudo usermod -aG dialout $USER. Log out and back in afterwards.
Limits
- Serial devices are reached on a local serial port only. There is no Modbus RTU over TCP, serial-over-TCP or UDP. A device behind an RTU-to-TCP gateway is added as a TCP device, with the gateway's IP address and port.
- No detection of baud rate, parity or data bits.
- Only the eight baud rates above, 7 or 8 data bits, 1 or 2 stop bits, and no flow control (RTS/CTS or XON/XOFF).
- No function code 23 (Read/Write Multiple Registers).
- The adapter needs a working driver from the operating system or its vendor. Modbus Connect does not install one.
Try RTU and ASCII in Demo Mode
Download Modbus Connect 0.8.9 for Windows, macOS or Linux, turn on demo mode and add a DEMO-RTU or DEMO-ASCII device.
Download Free Beta →Related Articles
How to Scan a Network for Modbus Devices
Find every Modbus TCP device on your network instead of guessing IP addresses one at a time.
Getting Started with Modbus Connect
Step-by-step setup and usage tutorial for new users.
Modbus Scanner Finds No Devices? Here's Why
The real reasons a scan comes back empty, and how to fix each one.